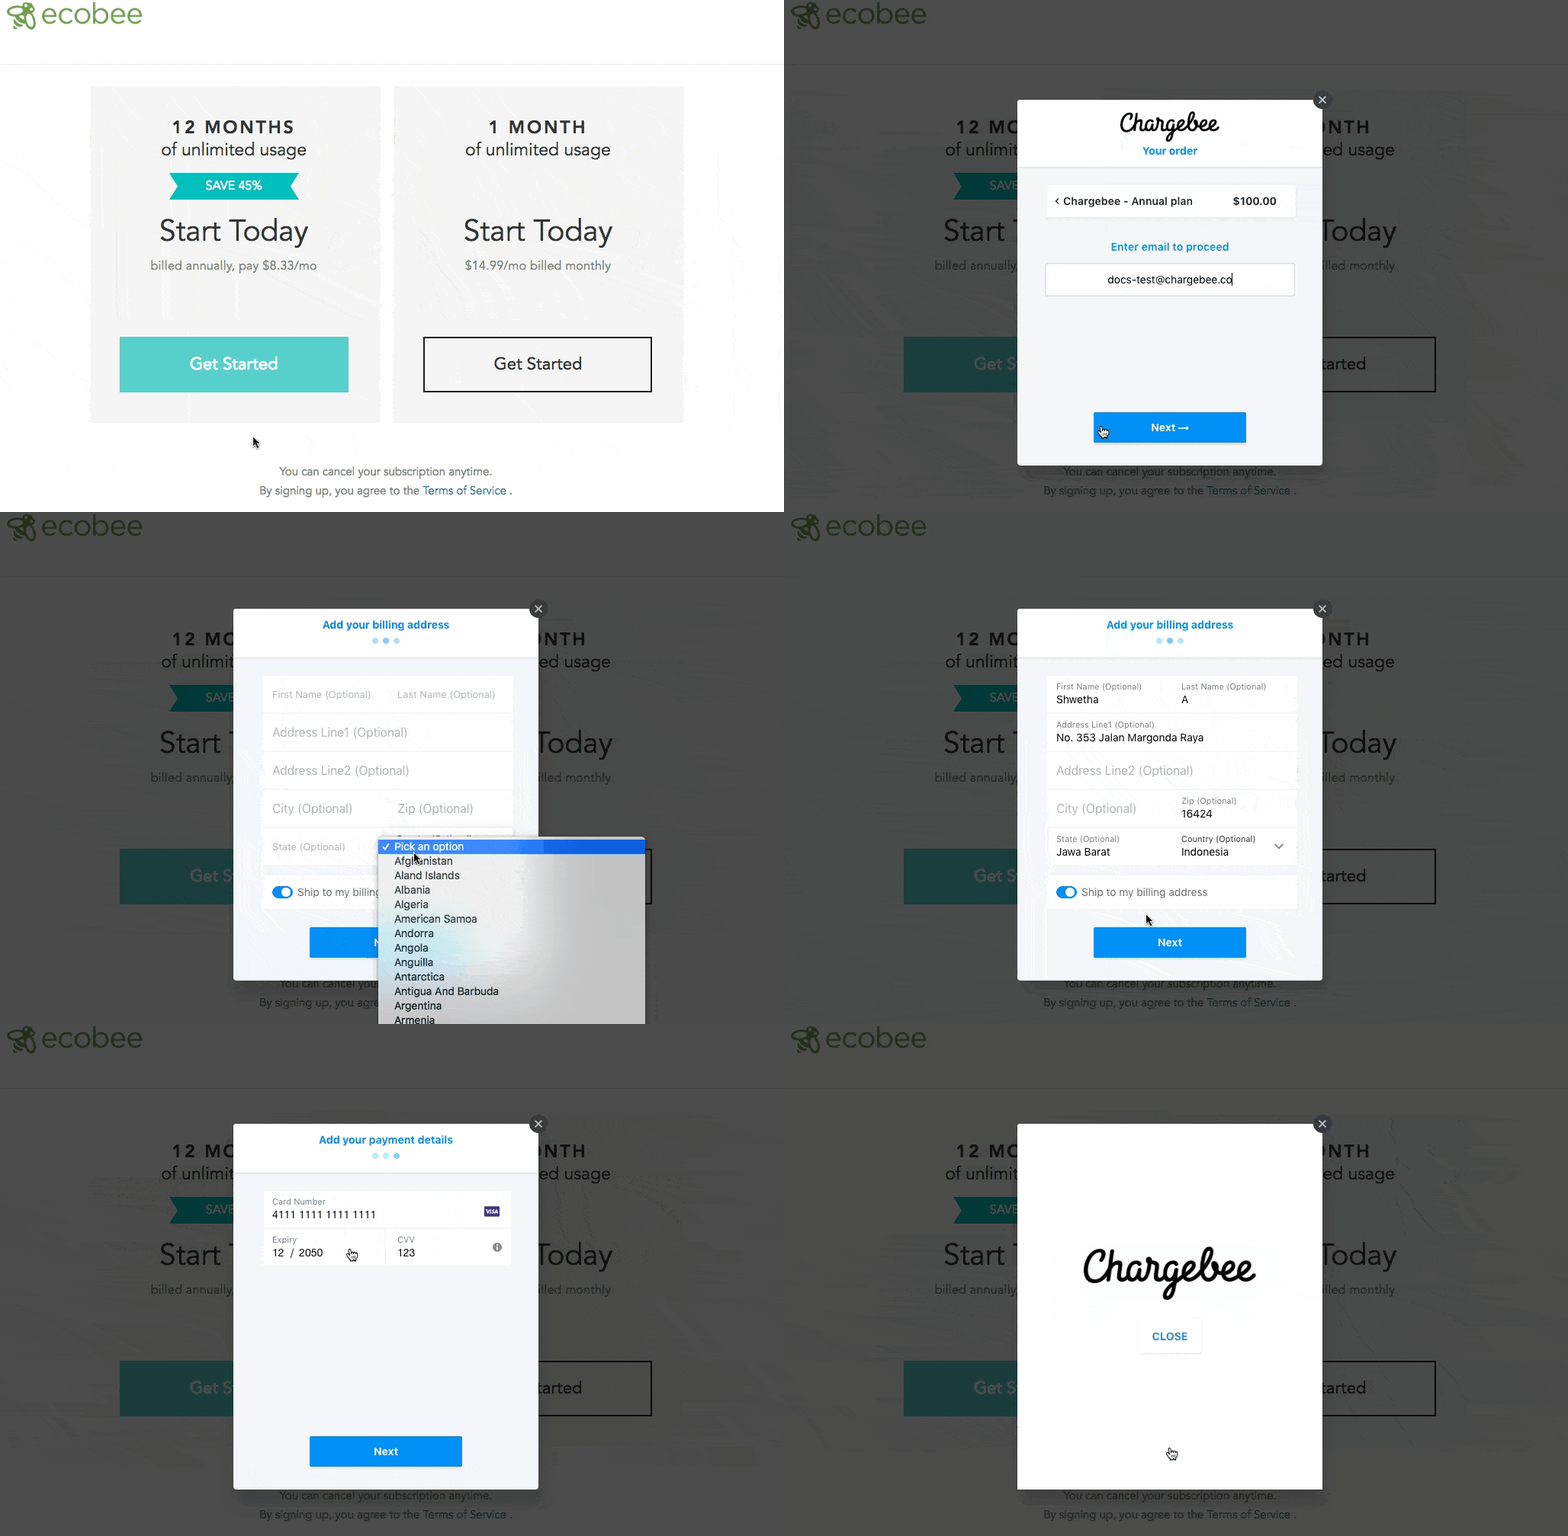
In-app Checkout is an intuitive pop-up type checkout. Customers can use it to enter their account and payment details when they checkout a product/service from your application/website. You can also customize In-app Checkout to display your brand elements, fields, charges, taxes, add a thank you message, and experiment play around with multiple workflows to suit your business needs.
Here is a sample of how the In-app Checkout looks and works:

Before you configure In-app Checkout, make sure to do the following in your Chargebee site:
Create Product Families. To create a Product Family, click Product Catalog > Product Families > Create Product Family. Learn more about Product Families.
Create Plans. To create a Plan, click Product Catalog > Plans > Create Plan. Learn more about Plans.
Configure a payment gateway of your choice to process payments. You can connect Chargebee with gateways like Stripe, Authorize.net, Braintree, and so on. To configure a payment gateway, click Settings > Configure Chargebee > Payment Gateways > Add Gateway. Learn more about configuring payment gateways.
Configure your brand elements such as logo and brand color. These elements appear on In-app checkout, Emails and Invoices. To configure brand elements, click Settings > Configure Chargebee > Brand Styles. Learn more about branding.
Depending on your application/website's framework and business model, you can choose how to integrate In-app Checkout. Chargebee provides you with three options to choose from,
Embedding the Drop-in Script.
Embedding an Item specific URL.
Use Chargebee's Hosted Pages API (recommended if you want to authenticate the user at your end, override payment-related information, handle returning users, collect additional information, etc.)
Drop-in Script is a plug-in type easy to use solution that requires minimal developer help. You can easily create a checkout page by adding a script generated for the plan-item on your HTML page.
In-app Checkout integrated using Drop-in script is Level 1 PCI compliant. Hence you need to fill in this questionnaire before integrating.
Note:
Per compliance team, the merchant should review the following documents from the above link:
1) SAQ Instructions and Guidelines
2) Understanding SAQs for PCI DSS
The SAQs have to be filled out based on the applicability as per the guideline document and shared with the payment gateway. No document needs to be submitted to Chargebee.
To use the Drop-in Script to integrate In-app Checkout, follow these steps:
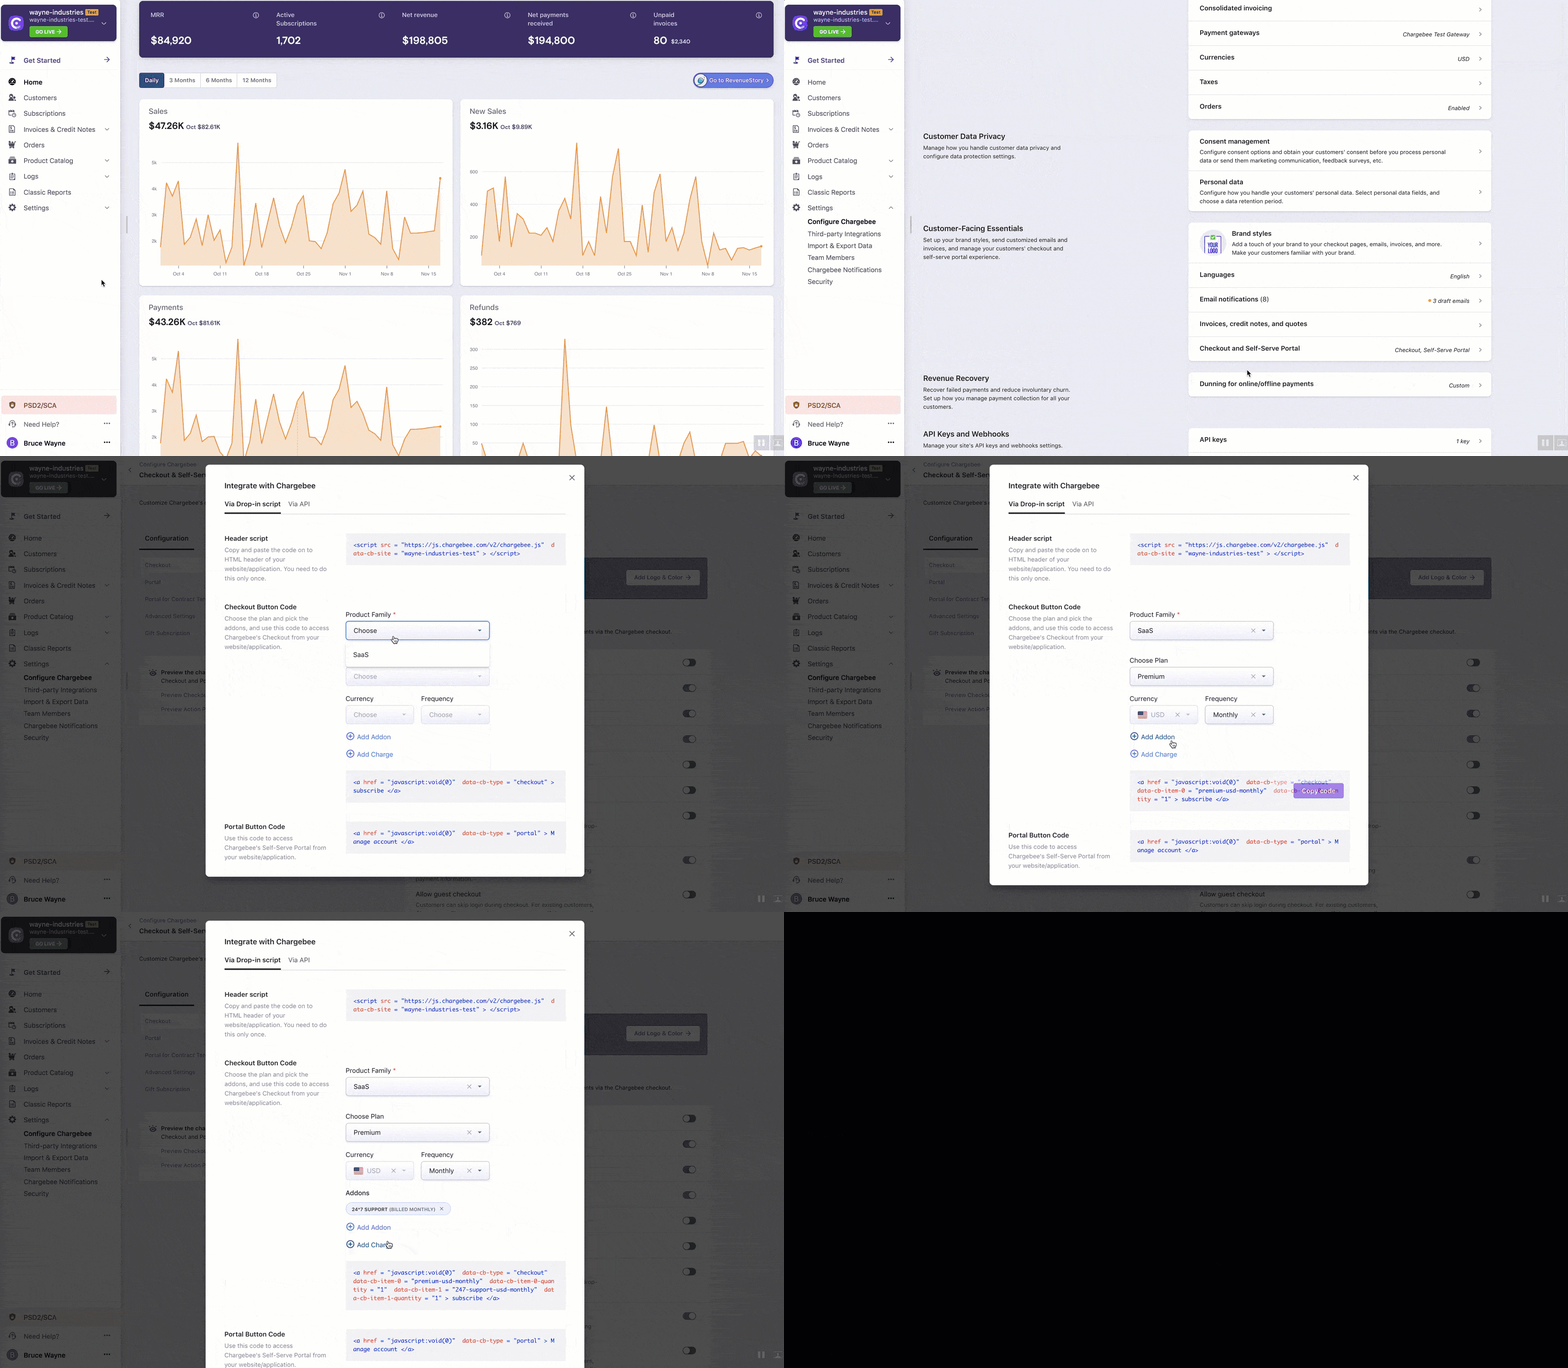
1) Click Settings > Configure Chargebee > Checkout and Self serve portal > Integrate with Chargebee.
2) Select the Product family, Plan, Currency, and Frequency from the drop-down list.
3) Add Addons and Charges if applicable using Add addon and Add charge options.

4) Copy the Header script and paste it within the head element of your website's HTML.

5) Copy the generated Checkout Button Code and hyperlink it in the subscribe button in your website's HTML. This way, when a customer clicks the subscribe button, the In-app Checkout opens and displays the above selected parameters of plan name, frequency, addon, and so on.
Checkout Button Code for a particular plan-item can also be copied from the respective plan page. Following are the steps to copy code from a plan page:
Click Product Catalog > Plans > Select a plan > Select a price point.
Navigate to the Customer-Facing Info section, click Grab Script.
Select addons if necessary and click Copy code.
The copied script can now be embedded in your website's checkout page.
Chargebee allows you to construct a customized URL where-in, you can pass additional customer and subscription information during checkout. The resulting Checkout URL can then be embedded into your application/website.
You can also retrieve subscription details once a sign-up is successful. This information can be used in case you want to display custom messages to your customers after signing up.
Here's is an example of an item-specific URL for a plan:
https://{sitename}.chargebee.com/hosted_pages/checkout?subscription_items[item_price_id][0]={item_price_id}&subscription_items[quantity][0]={quantity}
To use the customized URL, the placeholders need to be replaced with your Chargebee site name and Plan ID or Plan Price Point ID.
For example,
For a site named mars-voyage.chargebee.com having Plan Price Point ID as "mars-trip-usd-monthly" you can construct the item specific URL as below:
https://mars-voyage.chargebee.com/hosted_pages/checkout?subscription_items[item_price_id][0]=mars-trip-usd-monthly&subscription_items[quantity][0]=5
Further, you can add addons, charges, and coupons to the query string (part in the URL followed by the question mark) to create a plan. When the users click on the link, it displays the checkout window with the plan details. Your customers can use this link to preview the subscription details they are signing up for, securely input payment information, and complete their purchases.
Let us see an example where an item-specific URL is being used:

Here is how an Item specific URL for a plan with addons and charges would look like.
https://mars-voyage.chargebee.com/hosted_pages/checkout? <br />subscription_items[item_price_id][0]=plan-mars-bunker-rent-usd-monthly& <br />subscription_items[item_price_id][1]=addon-oxygen-supply-usd-daily& <br />subscription_items[item_price_id][2]=charge-spacesuit-with-pockets& <br />subscription_items[quantity][2]=5& <br />coupon_ids[0]=instigator-settlement
The following table describes the above example URL:
| Attributes |
Sub Attributes |
Description |
|---|---|---|
| subscription_items[] |
Details of individual item prices that are part of this subscription. |
|
| item_price_id |
The unique identifier of the item price. Example: |
|
| addon_id |
Addons that can be added. |
|
| charge_id |
Charges that can be added. Example: subscription_items[item_price_id][2]=charge-spacesuit-with-pockets |
|
| quantity |
The quantity of the item purchased. Example: subscription_items[quantity][2]=5 |
|
| coupon_id |
Coupon IDs that can be added. |
Here is an API spec of query parameters supported which can be used in the plan URL.
| Module |
Query Parameter |
|---|---|
| Subscription Item |
subscription_items[item_price_id] subscription_items[quantity] |
| Coupons |
coupon_id |
| Customer |
All parameters in Create checkout for a new subscription endpoint can be used. exceptions: taxability, consolidated_invoicing |
| Subscription |
subscription[start_date] subscription[<custom_field_name>] |
| Billing address |
All parameters in create checkout for a new subscription billing address can be used. exceptions: validation_status |
| Shipping Address |
All parameters create checkout for a new subscription using shipping address can be used. exceptions: validation_status |
| Business Entity ID |
business_entity_id Learn more. |
Using Hosted Pages API to create In-app Checkout is the recommended approach when you already maintain a user-management or authentication system. It gives you control over overriding item price and changing the trial end date. This requires significant developer efforts from your end.
Handling payment details via API requires you to be PCI compliant. Your payment gateway/payment service provider will determine the level of PCI compliance and other requirements. Contact your payment gateway/payment service provider to figure out the PCI compliance requirement.
Allows you to manage authentication, collect additional information in your application/website.
Allows you to override plan and add-on pricing during checkout.
Optimize trial tenure. This allows you to customize the trial tenure based on the customer (For example, you can offer a 14-day trial to one customer, and a one month trial to another).
Here's a quick example on when you may want to choose Checkout via API over Drop-in script:
Let us assume that James runs a digital weight loss and fitness app. He wants to collect user information such as the client's height, weight, food habits, and so on along with their address, email, and store it in his database instead of Chargebee. He would still like to use Chargebee's In-app Checkout as he does not want to get involved in the nitty-gritty details of PCI Compliance.
James can choose the API integration as this would allow him to collect additional information at his frontend and then use Chargebee's Hosted Pages API to collect the remaining information (specifically payment details for example).
To understand more about the integration and implementation of Checkout via API, read our developer documentation .
Chargebee's In-app Checkout supports 3DS payments. Complete the actions specified in our SCA checklist and Chargebee will seamlessly start handling 3DS payments via In-app Checkout.
For scenarios that do not involve immediate payment such as subscriptions with trial, first-time charge waived off using coupon, and zero-dollar plan (only if collecting payment information), Chargebee performs minimum amount 3DS authorization. The authorized amount is automatically voided. This ensures that subsequent payments mostly go through without customer intervention.
For scenarios that involve immediate payment such as subscription without trial, subscription upgrade and so on, Chargebee takes care of initiating the 3DS flow and enabling 3DS verification to happen.