Chargebee integrates with Google Analytics using your Google Analytics account tracking ID. This integration helps you track page-views and information related to visitors traffic on Chargebee's Single Page Checkout & Portal (checkout pages, thank you pages, customer portal.)
Chargebee adds the Google Analytics tracking code only to the Single page Checkout & Portal. Ensure that you add the tracking ID in the other pages of your website that you would want to track.
Having a Google analytics account would be a basic prerequisite to set up GA with Chargebee. Sign up for a GA account if you do not have one already.
Once you have a GA account, follow these steps to connect it with Chargebee.
Step 1: Copy the tracking ID from your Google Analytics Account.
Instructions to copy the tracking ID from your Google Analytics Account here.
Step 2: Enter the tracking ID in Chargebee
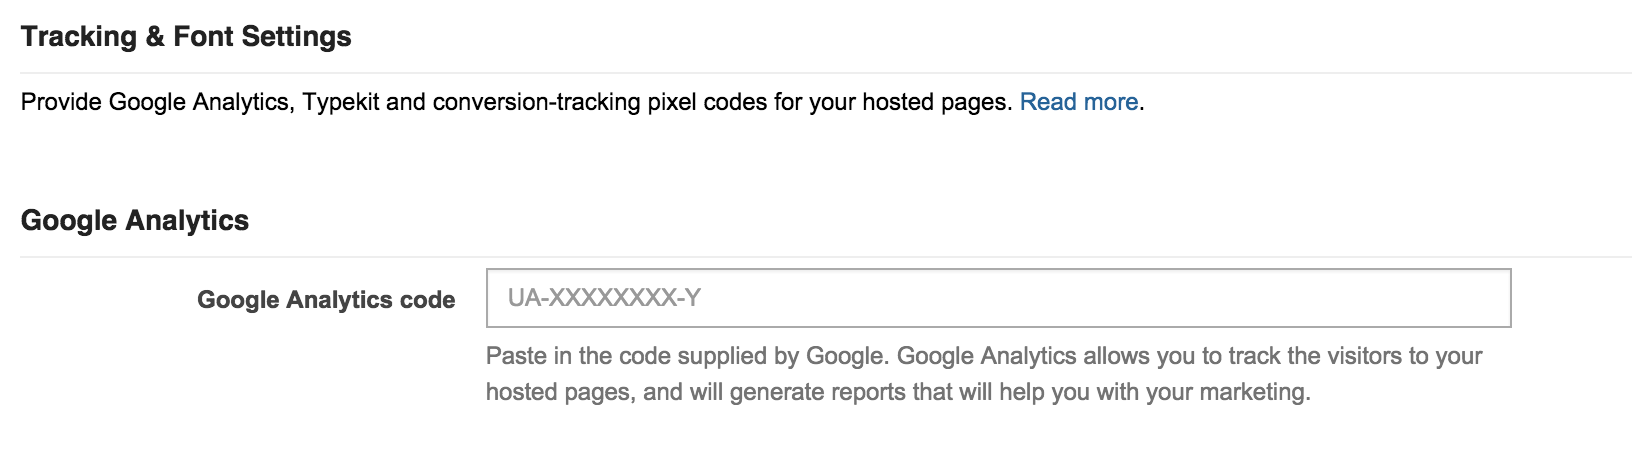
To do this, go to Settings > Configure Chargebee > Checkout & Self-Serve Portal > Tracking and Font Settings.
Enter the tracking ID under the Google Analytics section in Chargebee as shown below,
When customers are redirected to Chargebee's checkout pages, they move from your domain to Chargebee's domain. In such a scenario, to ensure that tracking happens across domains, you need to enable Cross Domain Tracking within Chargebee.
To enable Cross Domain Tracking, you will have to include a small code snippet within your website. This has to be included at the exact page in your website from where customers will be led to Chargebee's checkout pages. This is usually your plan/pricing page.
For example, say this is your workflow:
Customer comes to your site -> Clicks on your Plan page -> Clicks on Subscribe -> Is taken to Chargebee's checkout page.
In this case, you will have to include this code snippet in the page where the "Subscribe" button is placed.
Click here for the code snippet that has to be included for Cross Domain Tracking.
Another important aspect of ensuring that the right data is tracked, is to ignore self-referrals. If self-referrals are not ignored, all your conversions will have your own site listed as a referral.
Hence, ensure that you add your domain name and also your Chargebee domain name under the referral exclusion list.
Follow these steps to add domains to the referral exclusion list.
Google Analytics helps you track the number of visitors and the traffic in your website. However there are some important metrics that can only be tracked with some additional setup.
Additional insights such as the number of customers making a purchase, the number of customers dropping out before purchase, etc. can be tracked by setting up goals and funnels.
The target objective that you would wish to track has to be configured as your goal.
If you would want to track the number of conversions, that becomes your goal.
With respect to Chargebee, a conversion would be when a customer subscribes for a product/service on your website by successfully completing the checkout process.
Goals give you valuable information about visitors' actions on your website. They help you track your business objectives and verify if they have been achieved.
A funnel specifies the exact series of steps you would want your users to follow in the process of attaining a goal. A funnel is linked to a goal. If your goal has only one step, you wouldn't require a funnel.
A funnel helps you identify the exact problem area which is causing users to drop out. It identifies the leaky part of the conversion process which would require more attention.
Google Analytics offers many types of goals. Of these types, to track the number of customers checking out, a ‘Destination Type Goal' has to be set up. This way, when customers reach the destination, the goal gets triggered. After customers make a purchase/checkout, they are redirected either to Chargebee's Thank You Page or the redirect URL (depending on what you have configured). This forms the destination part of the goal.
Follow the steps given below to setup a goal to track successful checkouts.
Step 1:
In your Google Analytics (GA) account, under the Admin tab in the View level, select Goals and click New Goal.
Step 2:
Under Goal setup, select the Template option, then select Place an Order in the Revenue section. Click Next Step to move to Goal description.
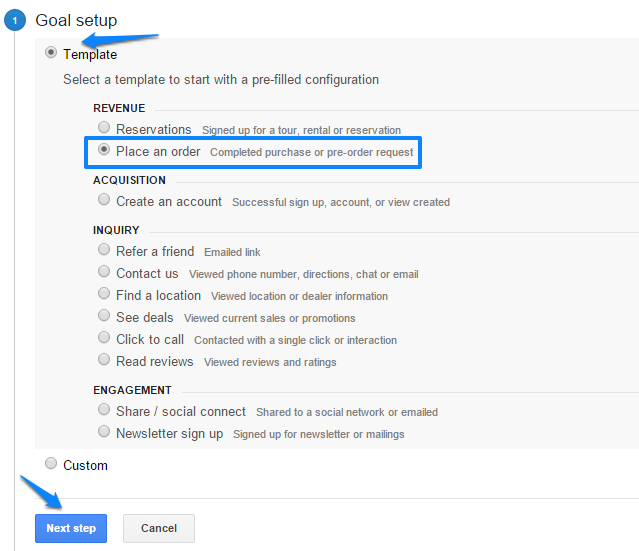
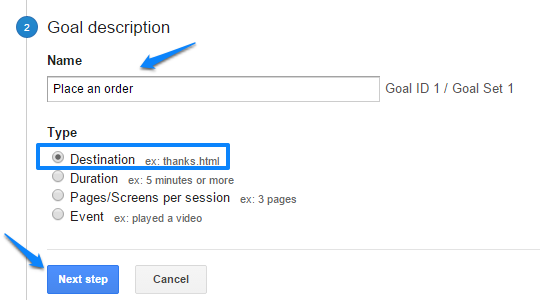
Step 3:
Enter your goal description, ensure that the option Destination is chosen, and click Next Step.
Step 4:
Configure the Goal Details as shown below:
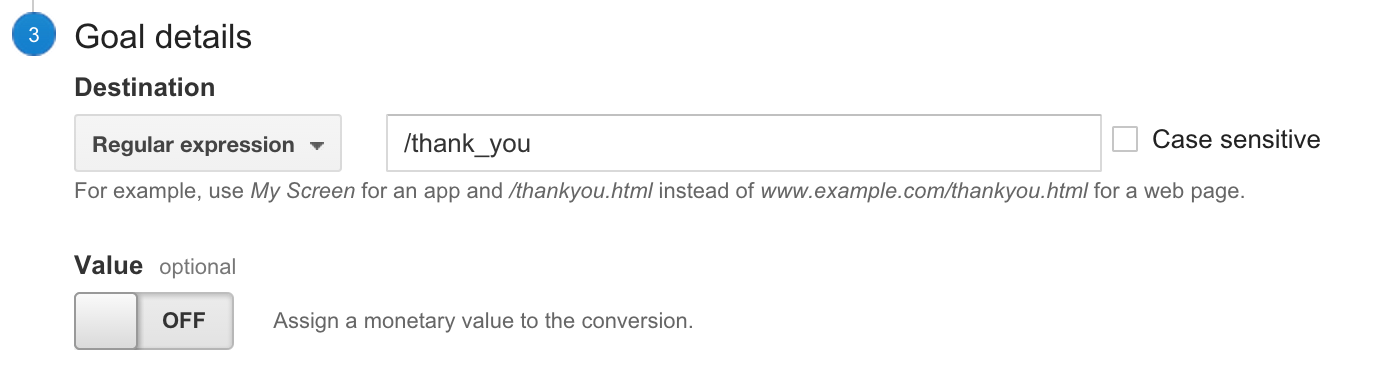
In the Destination section, set the Destination as Regular expression and enter any of the following URLs based on where your customers are redirected after checkout:
Enter /thank_you if you have Chargebee's Thank You Page configured.
If you have your custom Redirect URL configured, enter the appropriate path as part of the Goal URL.
Step 5:
Save the Goal. Additionally, you could also set up a funnel to track the exact path through which the destination has to be reached.
A funnel helps you streamline the process of realizing a goal. With the help of a funnel, you can deep dive into specific metrics such as the number of users who abandoned the checkout page before making a payment, etc.
Let's consider your goal is to track the number of customers reaching the Thank You Page. For customers to reach the Thank You page, there might be multiple ways. However the ideal way would be,
Step 1 : Customers select a plan from your site and click ‘Subscribe'.
Step 2 : Customers are taken to the checkout page where they enter their payment method information (such as card) and complete the checkout.
The steps mentioned above have to be tracked as part of your funnel.
A sample funnel is shown below:
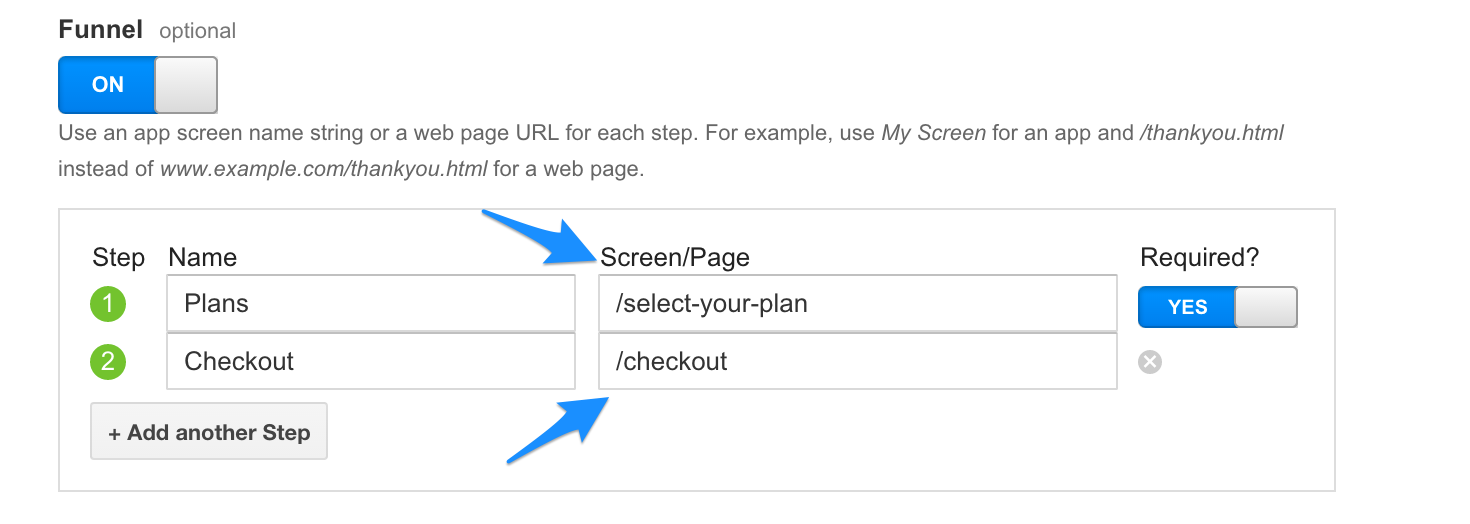
Ensure the URL you enter in the Screen/Page section is a part of the actual URL of your website's Screen/Page.
Here's a sample code snippet that has to be included in the page with the Subscribe button.
Replace UA-xxxxxx-x in this code snippet with your Google Analytics Tracking Code.
<script>
var gacode = 'UA-xxxxxx-x';
(function(i, s, o, g, r, a, m) {
 i['GoogleAnalyticsObject'] = r;
 i[r] = i[r] || function() {
 (i[r].q = i[r].q || []).push(arguments)
 }, i[r].l = 1 * new Date();
 a = s.createElement(o), m = s.getElementsByTagName(o)[0];
 a.async = 1;
 a.src = g;
 m.parentNode.insertBefore(a, m)
 })(window, document, 'script', '//www.google-analytics.com/analytics.js', 'ga');
 ga('create', gacode , 'auto', {
 'allowLinker': true
 });
 ga('send', 'pageview');
</script>
<script>
 (function() {
 /*
  * This is required to pass the linker parameter "_ga" to Chargebee, which
  * in turn could be sent to the Google to track vistors across multiple
  * domains. See https://goo.gl/jwqXvw to understand about the _ga query
  * parameter.
  */

  ga('require', 'linker');

  function addListener(element, type, callback) {
  if (element.addEventListener)
    {
    element.addEventListener(type, callback);
    }
    else if (element.attachEvent)
    {
    element.attachEvent('on' + type, callback);
    }
    }

  /*
   * This function decorates the link's URL with the _ga parameter. This
   * uses Google's directive to modify the link with the _ga parameter.
   * See https://goo.gl/YVZBMG
   */

   function decorateMe(event)
   {
   event = event || window.event; // Cross browser hoops.
   var target = event.target || event.srcElement;
   if (target && target.href)
    { // Ensure this is a link.
    ga('linker:decorate', target);
    }
   }

  /*
   * Here, this event listener, listens to the user's click event and
   * automatically calls the decorate function to append the _ga param
   * to Chargebee's hosted page URL. If you are redirecting users to
   * Chargebee's hosted pages via javascript, you have to call the decorate
   * function before that.  See https://goo.gl/obO8Hs.
   */
     addListener(window, 'load', function() {
     for (var i = 0; i < document.links.length; i++)
     {
       var dLink = document.links[i].href;
     if (dLink && (dLink.indexOf('chargebee.com/hosted_pages/plans') >= 0)
            || (dLink.indexOf('chargebee.com/pages/') >= 0))
     {
      addListener(document.links[i], 'click', decorateMe);
     }
     }
      })
    }());
</script>