Ensure that you have enabled Accounting fields for Xero. You can enable this by navigating to Settings > Configure Chargebee > Billing LogIQ > Enable Accounting Fields for integration.
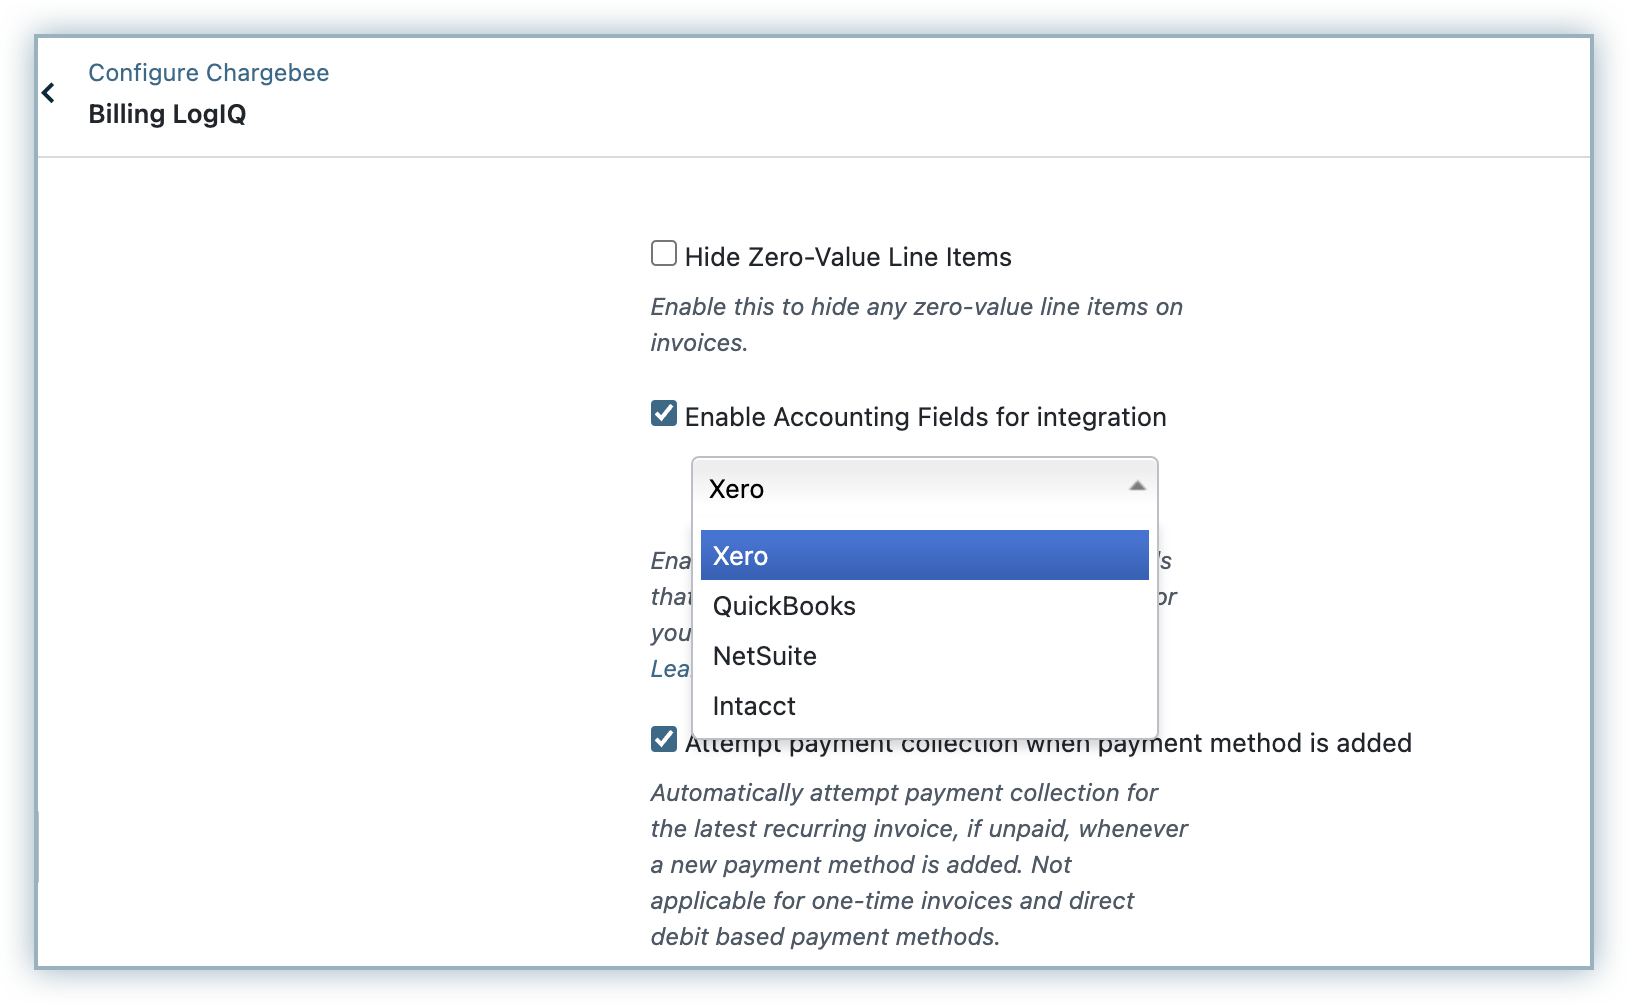
Enter/update accounting information for Plans and Addons in Chargebee. There are four accounting fields required to be filled to configure the integration between Chargebee and Xero.
They are SKU, Accounting Code, Accounting Category 1 (Optional) and Accounting Category 2 (Optional)

SKU/ Product Code/ Item ID: If a product/ service is already present in Xero, you can map the products by entering the Item ID/ SKU in Chargebee and avoid duplicates from being created.
Accounting Code: The General Ledger Account code in Xero should be entered. This lets Chargebee know in which Account the product related transactions should be posted to, in Xero.
Accounting Tracking Category 1, 2: You can provide additional information for tracking purposes, such as Class or Location. Tracking category can be set at customer or subscription levels as well, contact [email protected] to set this up.
If you have multiple currencies enabled in Chargebee, ensure that these currencies are enabled in Xero as well. You can view your currencies in Chargebee by navigating to Settings > Configure Chargebee > Currencies.
You can create a plan/addon with an ID of up to 50 characters in Chargebee. However, Xero supports an Item ID of up to 30 characters only. If there are plans/addons with an ID exceeding 30 characters, then you should enter an alternative ID as the SKU. In order to update the ID, navigate to the Product Catalog > Select a Plan/Addon > Edit > Enter an alternate ID in the SKU field.
Caution! If you have not already consulted your Accounting advisor, we strongly recommend that you do so before beginning the integration.
To connect, click Apps > Go to Marketplace > Accounting > Xero. Once you have selected Xero, click Connect and link your Xero organization.
Once you have authorized your Xero organization, Chargebee will perform the following checks:
Customer Invoices already present in Xero:
If invoices from Chargebee are already created in Xero, customers would have been created in Xero. In order to avoid duplicates, you should map the customer records.
You can download the customers file, map the customers and upload the updated sheet in Chargebee. Customers present in Chargebee and Xero will be mapped. If there is no possibility of duplicates, ignore and proceed. Read about the Customer data Mapping process in detail.
Currency check: The list of currencies enabled in Chargebee should be enabled in Xero. For instance, if USD and GBP are configured in your Chargebee, then these currencies should be available in Xero.
If you have Stripe Payment Gateway enabled, then you can follow Chargebee's recommended Reconciliation method:
Read more about Chargebee's recommended procedure for Reconciliation.
If you do not have Stripe gateway enabled, then you will not see this step.
If you have Stripe gateway enabled but wish to handle reconciliation on your own, you can skip this step and proceed.
a. Provide Account Mapping
Plans and addons can be mapped to individual accounts in Xero. This mapping is captured in the Product Catalog > Plan/Addon > Select a Plan/Addon and enter the GL Account Code.
You can configure the GL/ Bank Accounts for the rest here - Payments/Refunds and other Invoice line items.
Caution!
If you make any changes to the GL Account Name in your Xero account anytime after the integration is set up, you need to update them in Chargebee as well. Failing to do so could throw a sync error.
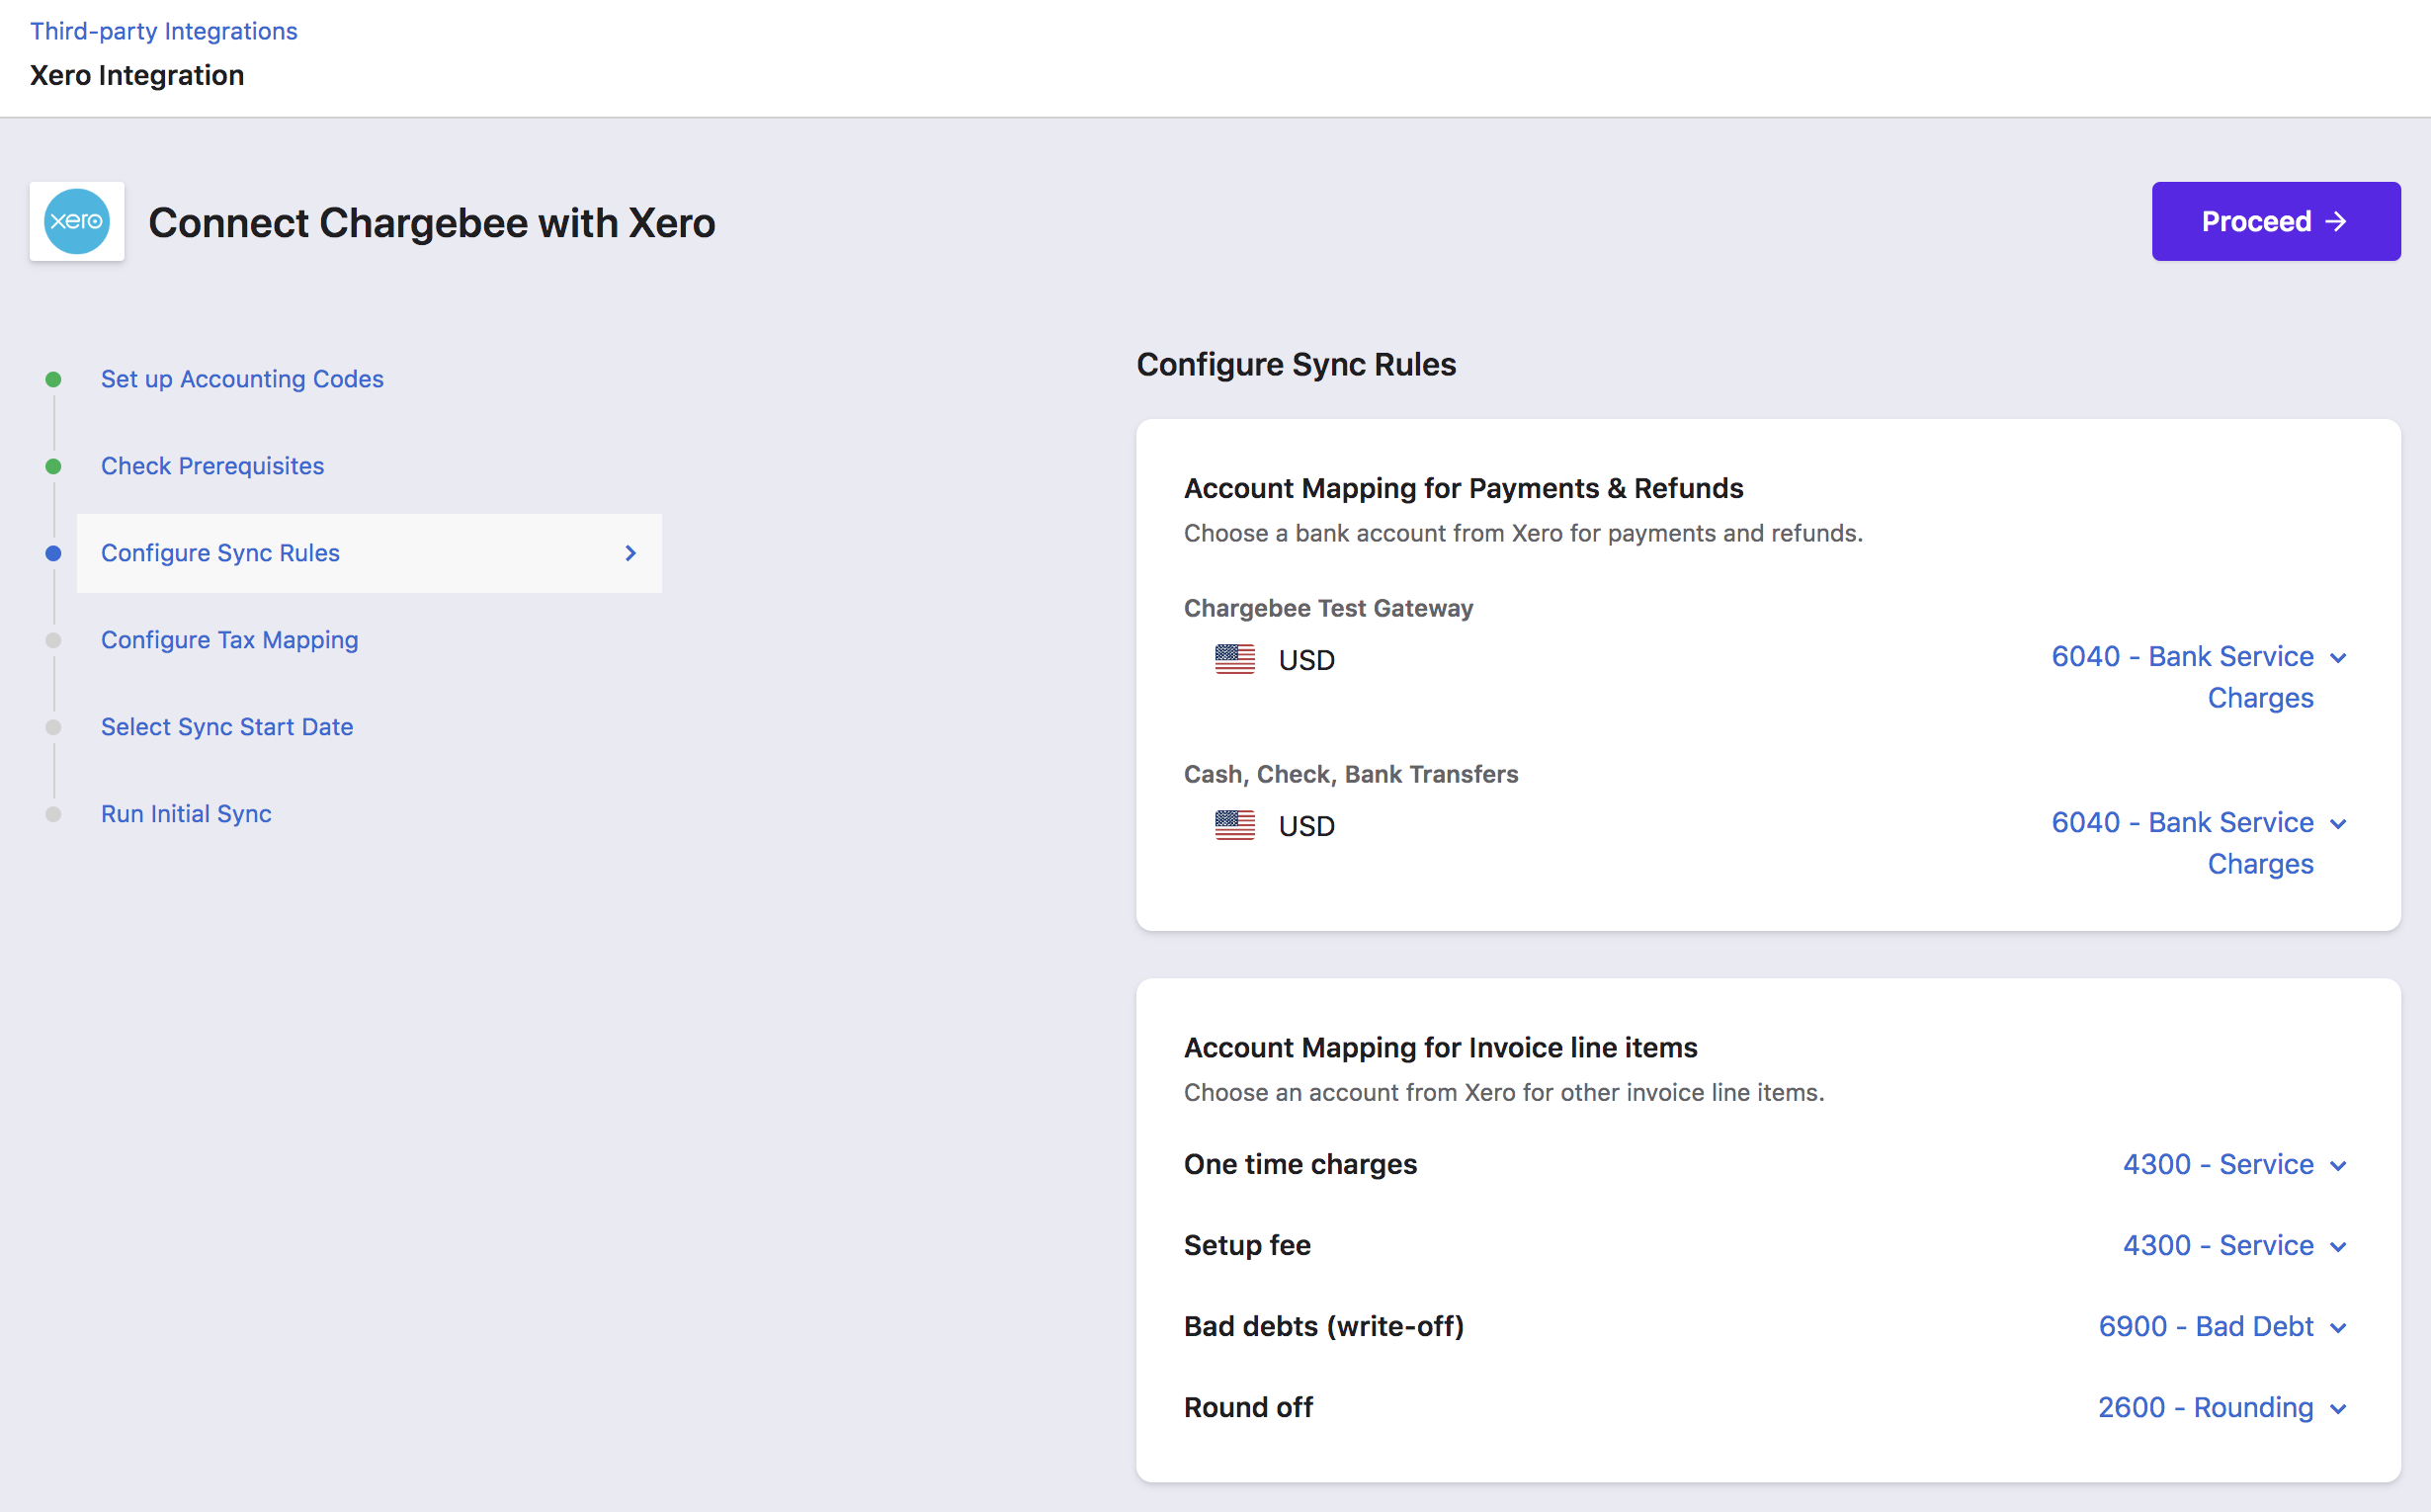
Discounts cannot be synced to a specific GL Account.
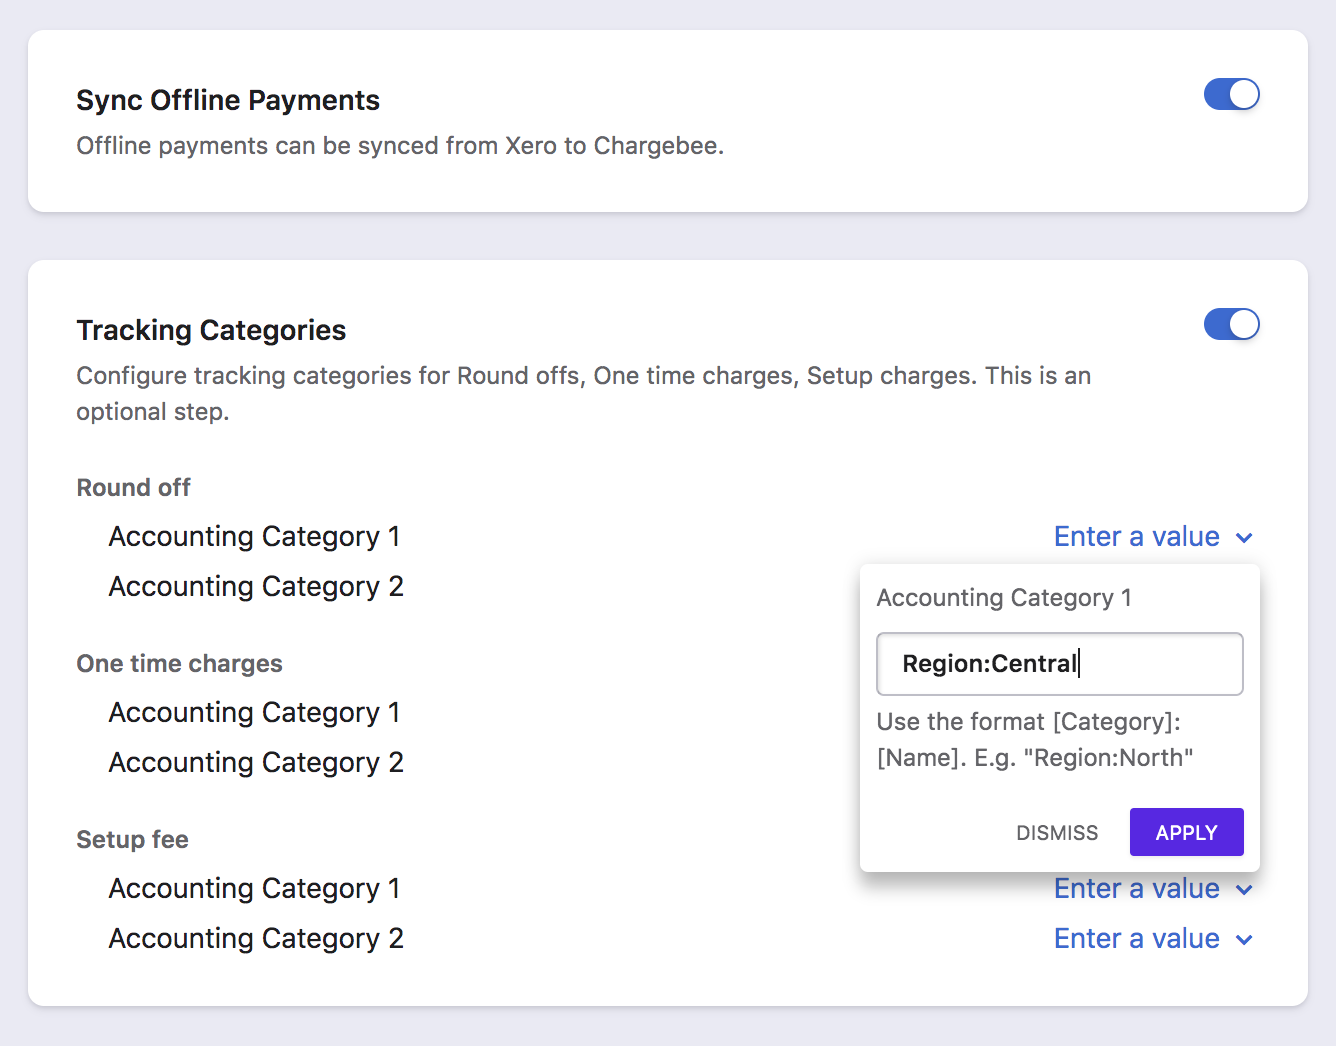
b. Sync Offline Payments
When offline payments are fed from the bank statement into Xero, Chargebee can read these payments and update the invoices. You can choose to enable this feature or not.
c. Enter Tracking Categories
If you have setup Tracking categories in Xero, you can enter the same in Plans/Addons page and for other invoice line items, you can provide the value here.
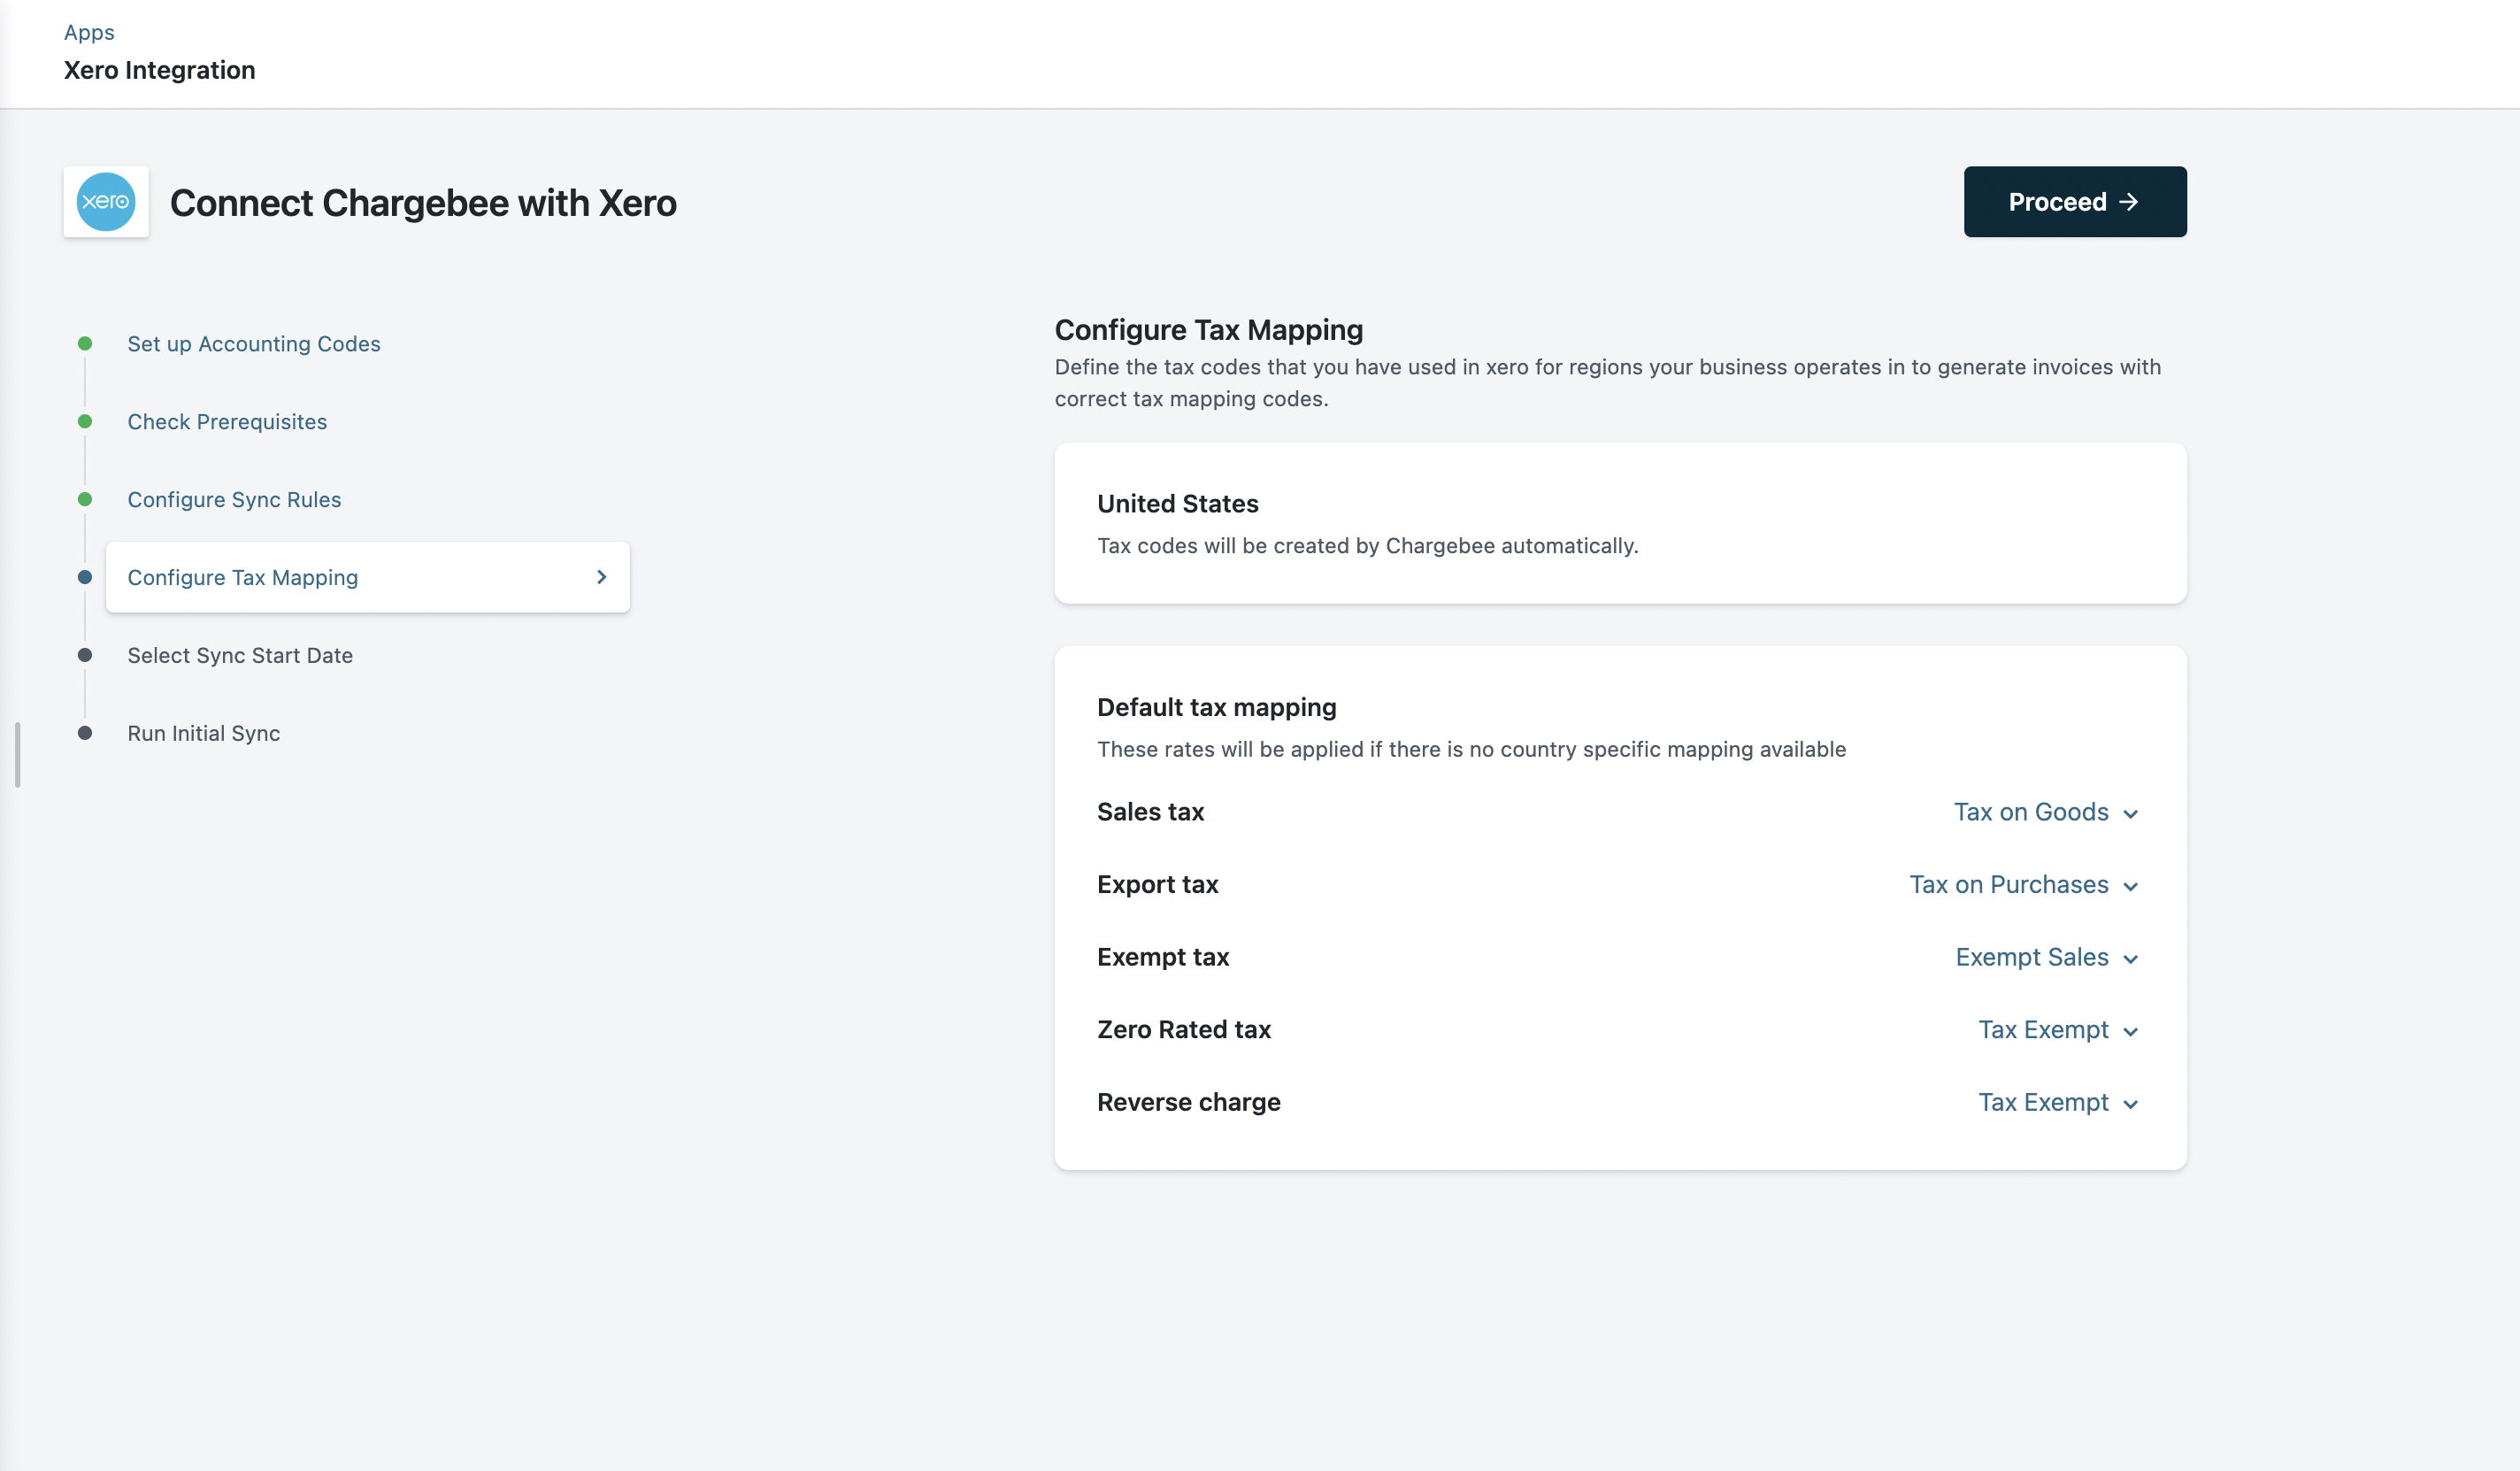
This step will be available only if you have enabled taxes in your Chargebee site.
Chargebee retrieves both the default and custom tax rates that are created in your Xero account. You can select a tax rate from the drop-down list and map for each category and region.
If you are using a US edition of Xero [International Edition]
Chargebee creates tax rates in Xero automatically.
If you are using a Canada, India, New Zealand, Australia, Singapore, or South Africa version of Xero
You can select from the list of tax rates from Xero for the following categories:
| Category | Select a tax rate from Xero |
|---|---|
| Sales | Select a tax rate to map all your taxable sales, for instance, New Zealand - 15% GST. |
| Exempt | Select a tax rate to map exempt sales (either the Customer is exempt or the Product is exempt). |
| Export | Select a tax rate to map sales to any other country outside taxable regions. |
If you are using the UK edition of Xero
EU VAT Returns filing is supported from within Xero. Xero creates default tax rates to facilitate accurate VAT Liability reporting. While configuring the integration, you can select from the default rates created in Xero already.
How Xero assists in VAT Return filing for UK Merchants.
List of default Tax types in Xero.
MOSS REGISTERED
(What is MOSS?)
In case you are selling Digital subscriptions across the EU region and have registered for MOSS, you should setup taxes for the following categories:
| Category | Select a tax rate from Xero |
|---|---|
| Sales | Select a tax rate to map all your taxable sales. Tip: You can also utilise the MOSS Reporting feature in Xero for filing returns. |
| Exempt Sales | Select a tax rate to map exempt sales (either the Customer is tax exempt or the Product is tax exempt). Taxes of type ‘Exempt' are retrieved from Xero for selection. |
| Export Sales | Select a tax rate to map sales from UK to a country outside the EU. |
NON-MOSS REGISTERED
In case you have not registered for EU VAT MOSS, setup taxes for the following categories:
| Category | Select a tax rate from Xero |
|---|---|
| Sales | Select a tax rate to map Sales tax Taxes of type ‘OUTPUT' will be retrieved from Xero for selection. |
| Exempt Sales | Select a tax rate to map exempt sales (either the Customer is exempt or the Product is exempt). Taxes of type ‘Exempt' will be retrieved from Xero for selection. |
| Export Sales | Select a tax rate to map sales from UK to anywhere outside EU. Taxes of type ‘Exempt' will be retrieved from Xero for selection. |
| Reverse Charges | When a B2B sale is made and the customer has provided a VAT Registration Number, based on reverse charge mechanism, the tax will not be applied. Select a Zero Rated Tax Rate for B2B Sales. Taxes of type ‘Zero Rated' will be retrieved from Xero for selection. |
| Sales to outside EU | Select a tax rate to map sales from UK to a country outside the EU. Note - For Non-MOSS registered merchants, Xero does not provide a Tax type or rate, but suggests the following work-around: For sale of physical goods from one EU Member state to another, the tax will be created of type MOSS_SALES. You can then manually update the sale amount in Box 6 and Box 8 in the VAT Return report. Read more about this approach in detail |
If you are using global version of Xero
You can refer to the above steps and do tax mapping for each country as required.
Select a date from which invoices generated in Chargebee should be synced to Xero.
You can choose one of the following:
You can sync invoices created from Oct 1, 2015.
Caution!
Once the configuration details are provided, you can begin with an initial sync. Chargebee will sync first 10 invoices to ensure the mapping, conventions and sync criteria align with your requirements.
We recommend that you take a look at these invoices in Xero. If the sync works as expected, you can click on the Sync All Records option and proceed or make changes if required.
Integration setup is now complete.
After you run the sync, you can view the last sync details, errors found during sync if any. You can choose to ignore the errors, if required. Chargebee will not sync the ignored records.
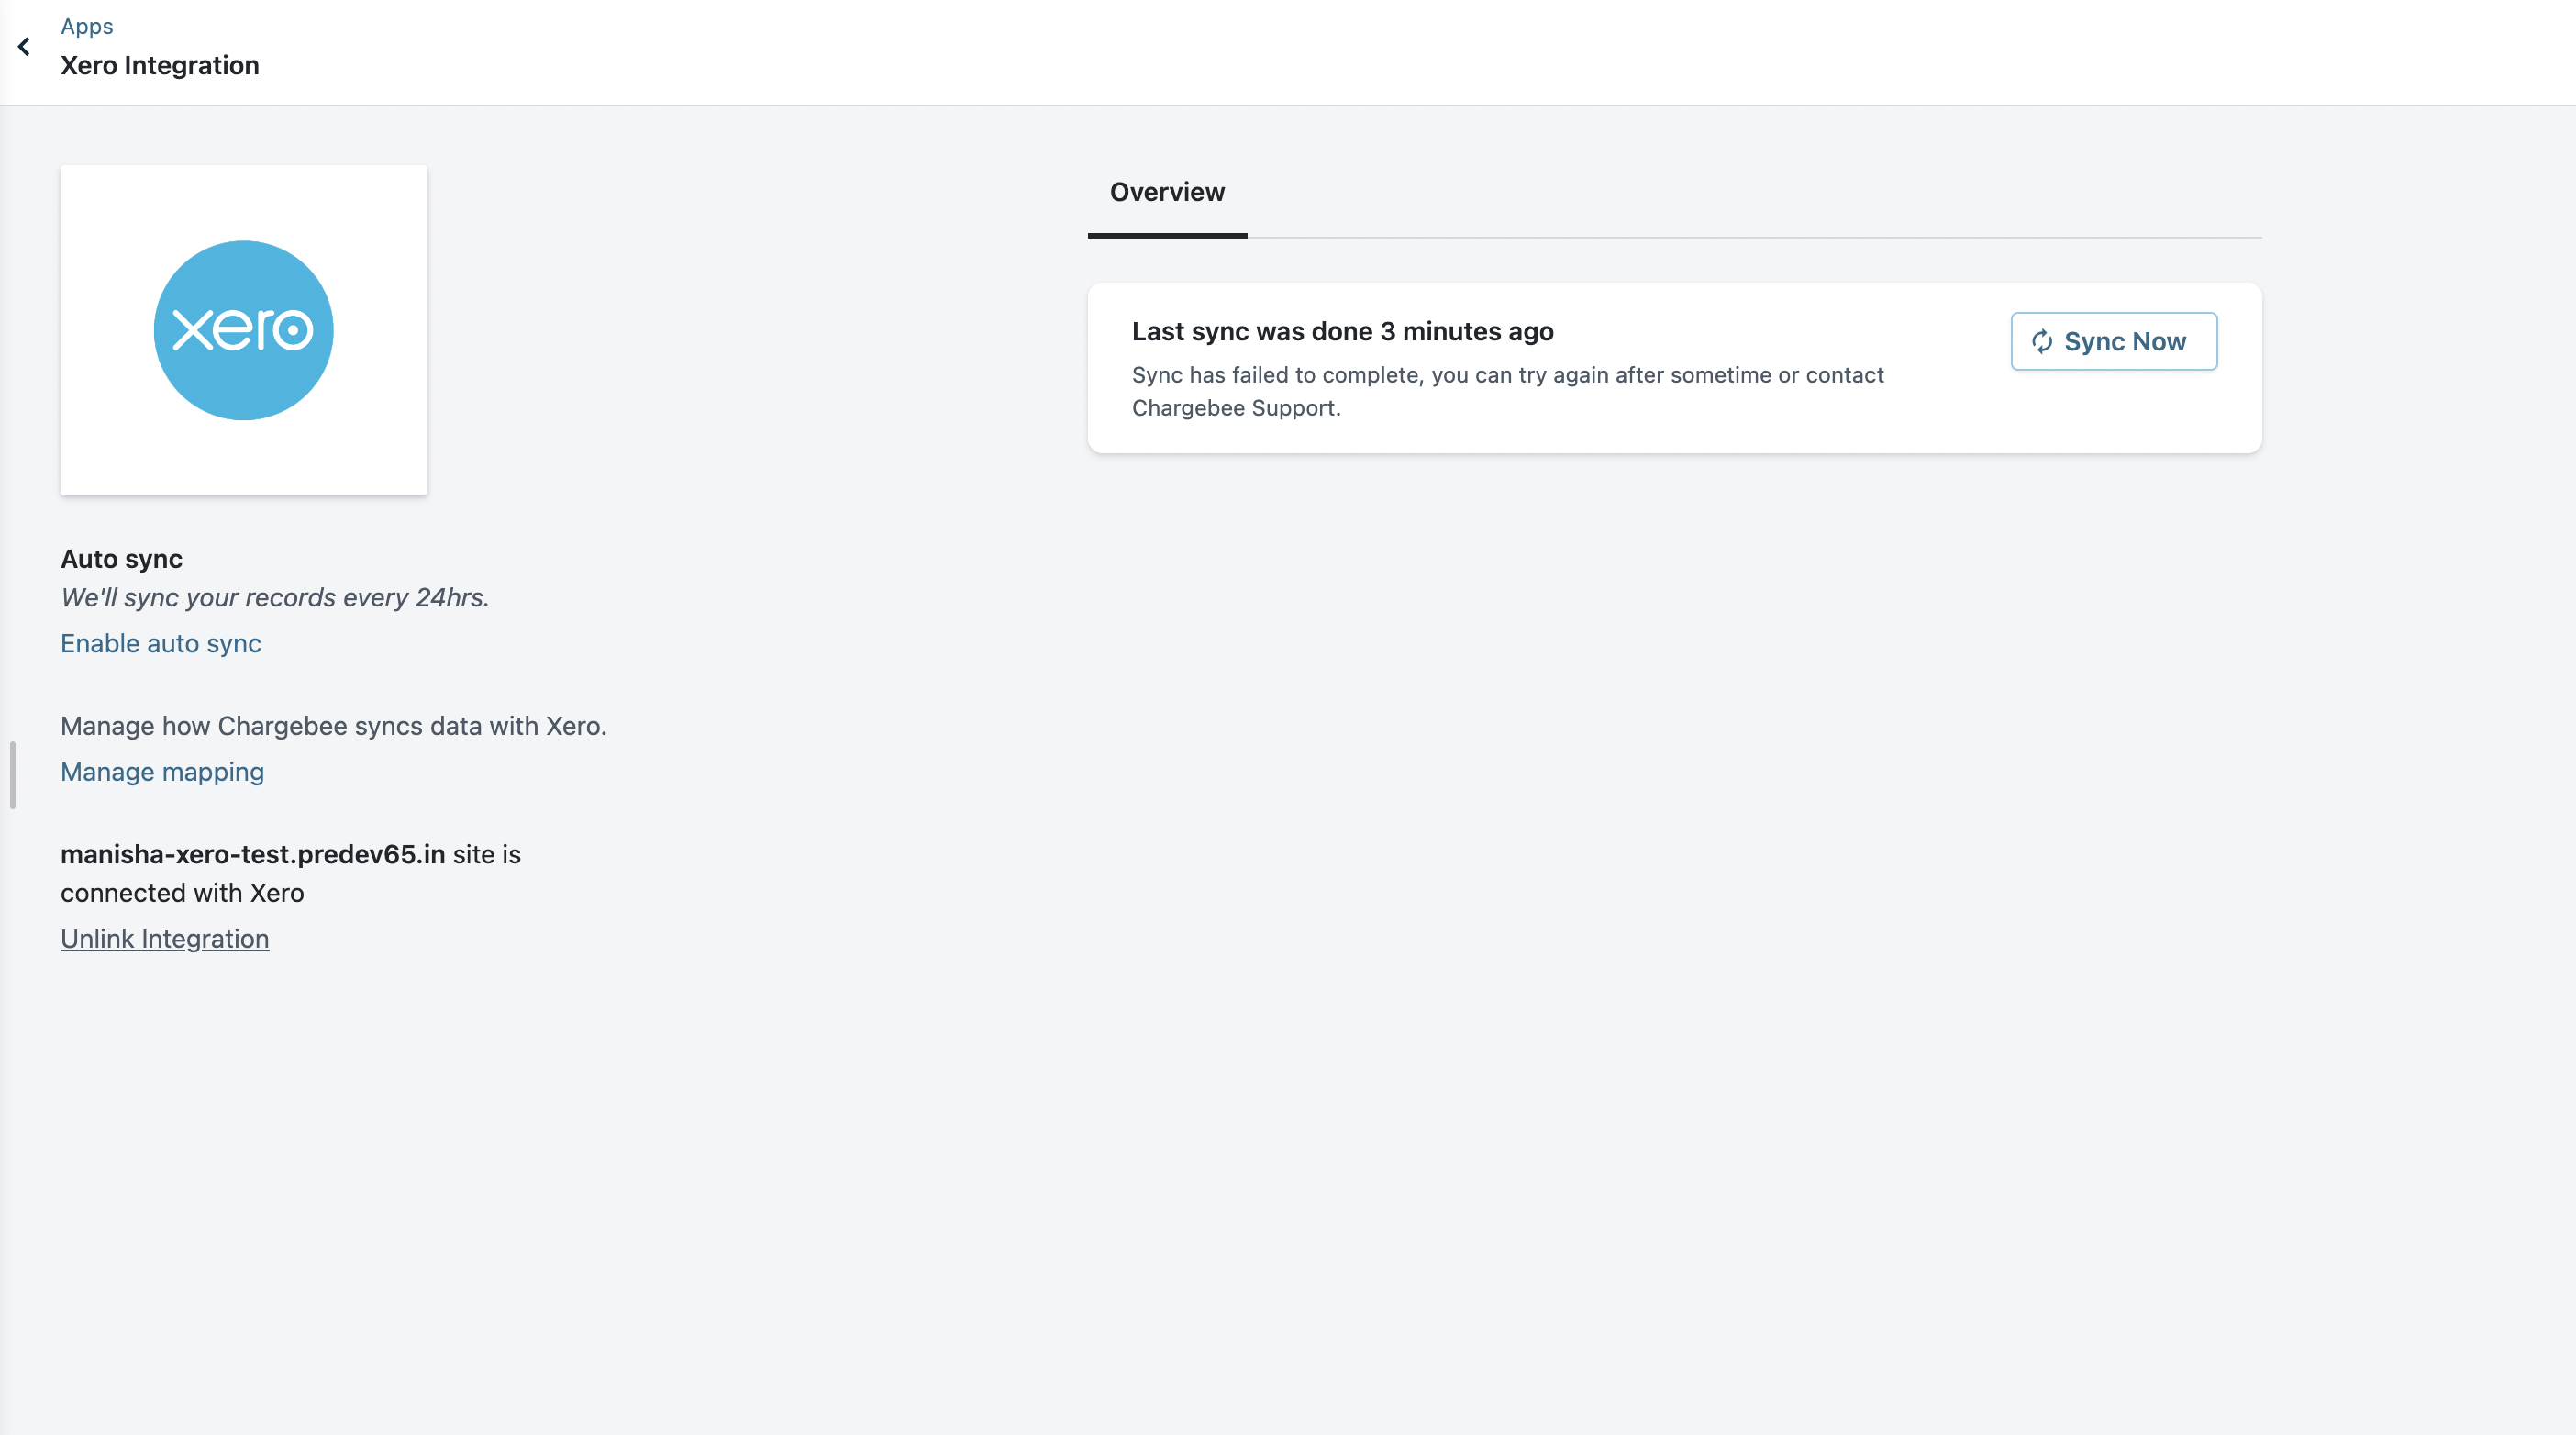
Sync Now
In case you need to push data from Chargebee to Xero immediately, you can do so by clicking Sync Now option.
Auto Sync
After setting up the integration, you can click on the Enable Auto Sync option to schedule automatic sync from Chargebee. Subsequent changes in Chargebee, such as subscriptions creations or updates, payments for existing invoices, refunds etc., will be synced to Xero once, every 24 hrs. You can choose to Disable auto-sync if necessary.
Manage Mapping
You can edit the sync rules configured as part of integration setup process:
Manage Tax Mapping
You can modify the tax codes selected during the setup process. If you have added tax regions in your Chargebee settings, you can provide the new tax codes here.
Unlink
In case you want to stop syncing data from Chargebee to Xero, you can click the Unlink option. Chargebee will stop sending data to Xero and:
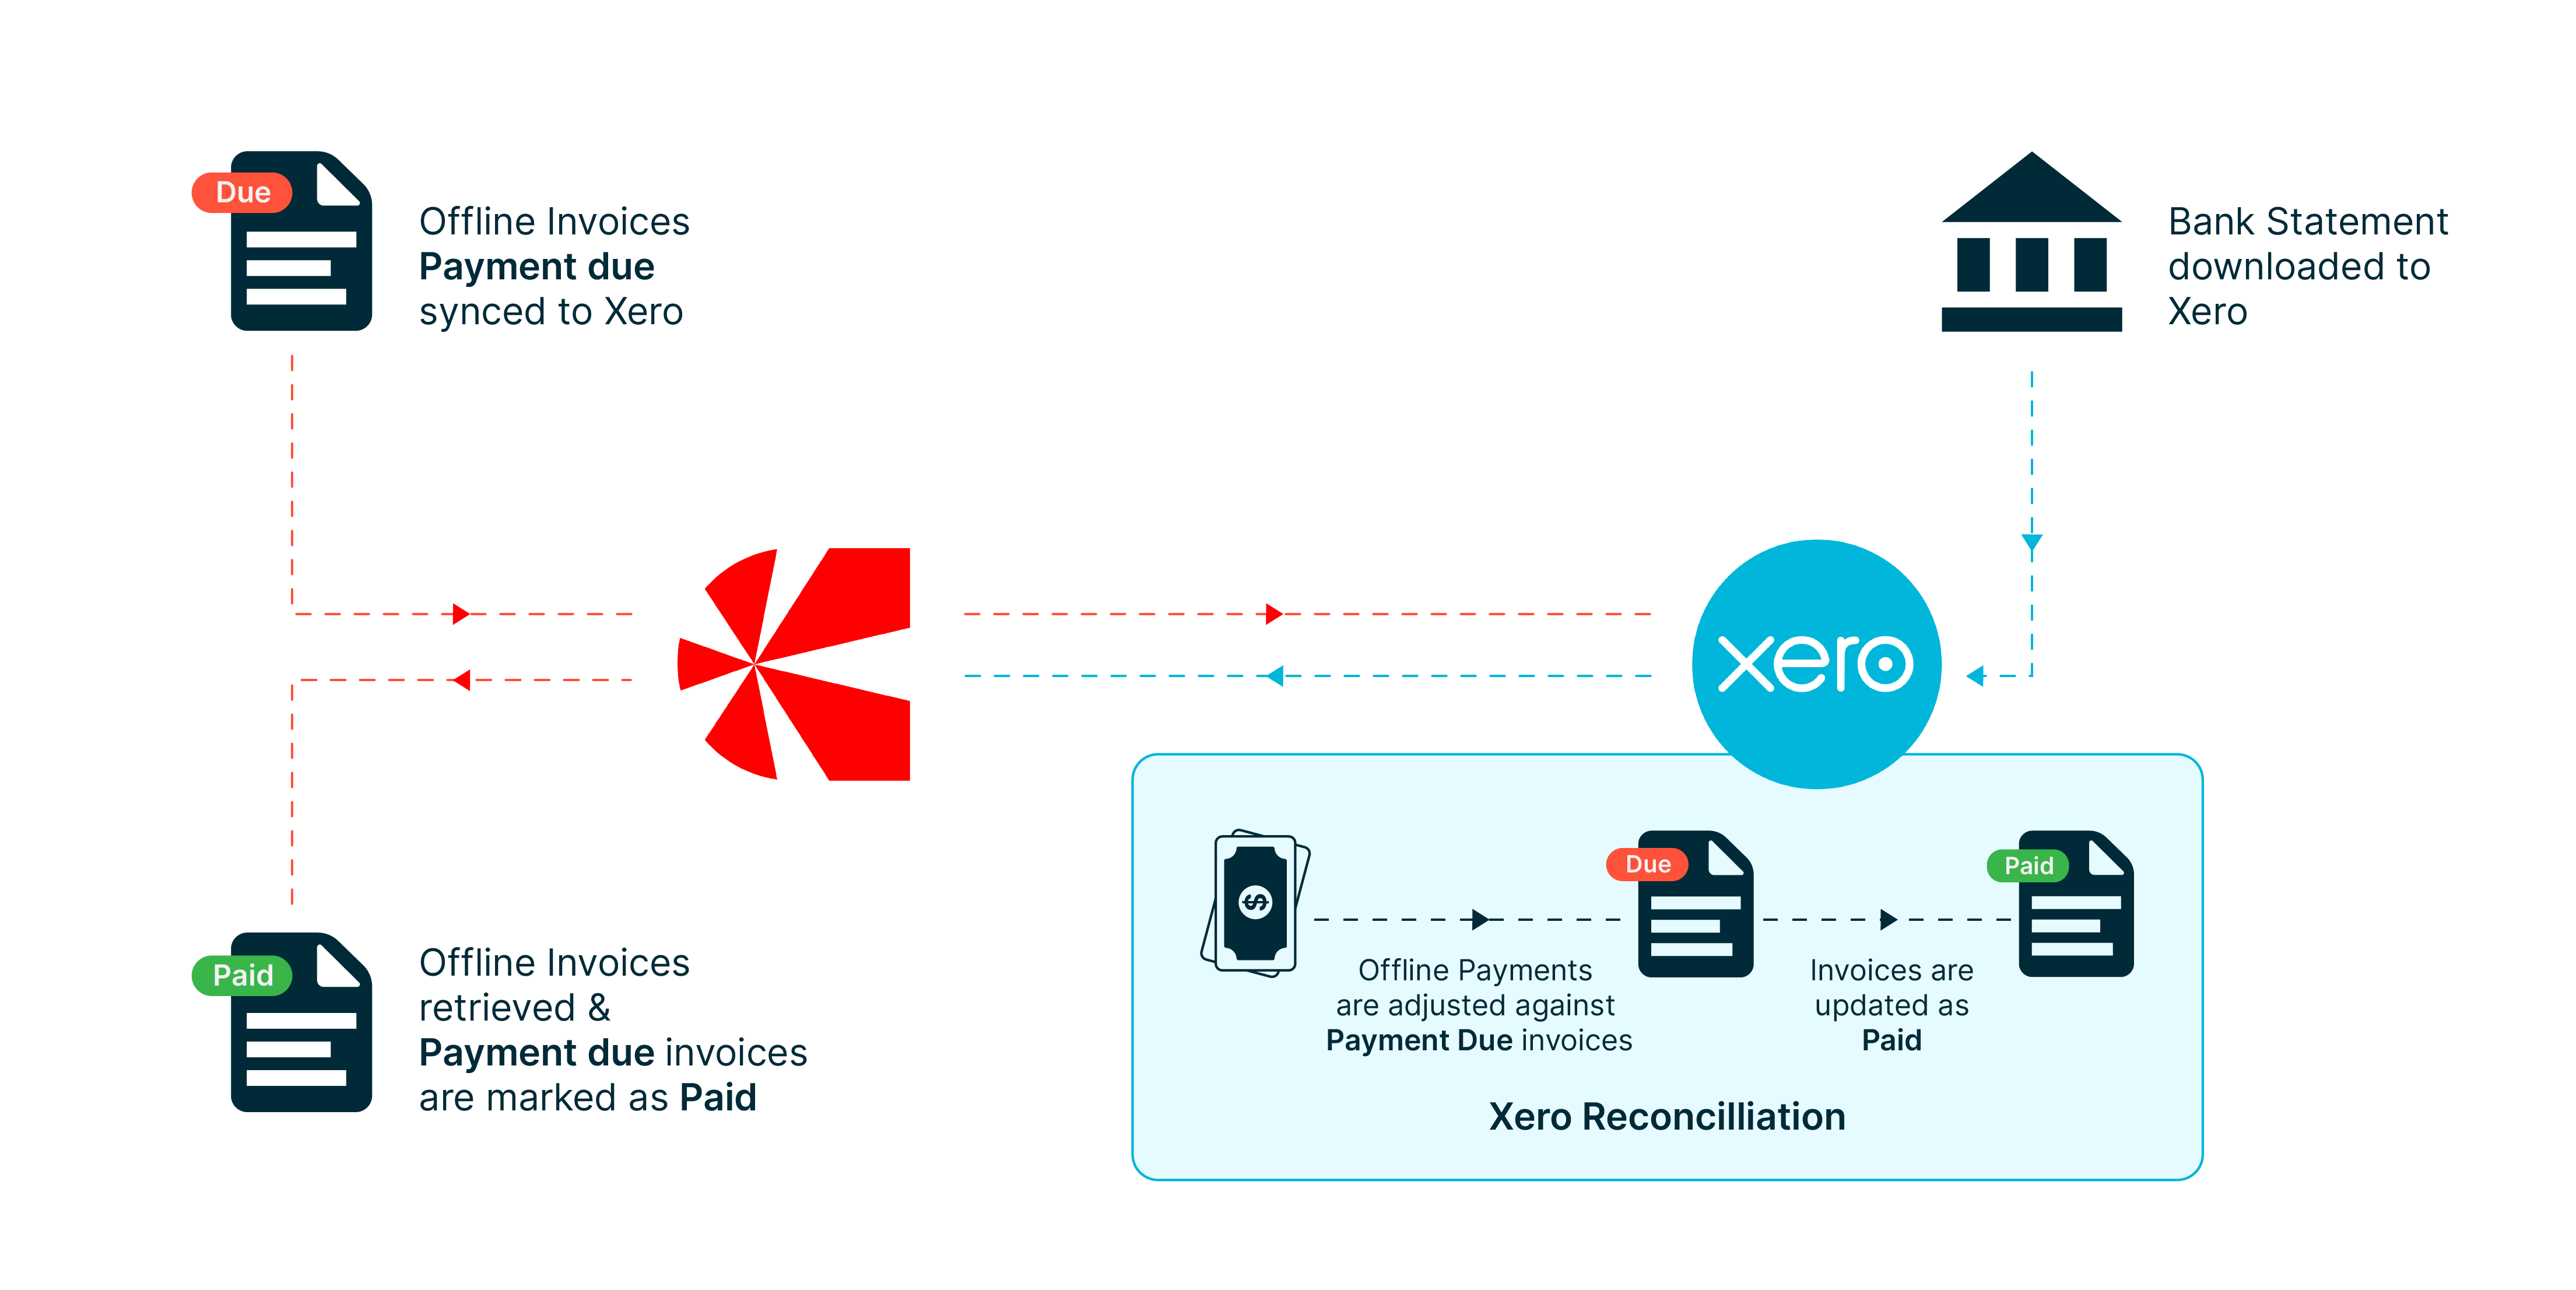
The exchange rate applied in Xero is not imported into Chargebee when the offline payment is imported.
Applicable only if you have Stripe gateway enabled.
You can download the payment gateway statement from here and upload it in Xero.
You can also update the clearing account if required (via Manage Mapping option)

Refer this document on Chargebee's recommended procedure to handle payment reconciliation in Xero.
For recognizing revenue in Xero, you can download the Revenue Recognition / Deferred Revenue Report from Chargebee. The report will provide the amount to be recognized, you can create the journal entries manually and update the Liability and Sales ledgers.
Can you connect multiple Chargebee sites to a single Xero account?
Yes, you can connect multiple Chargebee sites to a single Xero account. Additionally, if you have multiple Chargebee sites, you can connect each site to corresponding Xero accounts. Note, you cannot connect one Chargebee site to different Xero accounts or different Organizations in a Xero account.
Can I enable multiple tax regions for Chargebee - Xero integration?
Xero can report taxes in a single country and only the global edition of Xero supports multiple tax regions. We recommend users to either update to Xero's global edition or create different tax accounts and tax codes in Xero to support multiple tax regions. Click here for more information on how Xero supports tax returns in multiple regions.